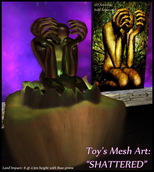
 Example of Mesh / 2D Art in SL
 But what I have always dreamed of but never thought would be reality would be to transform my 3D SL virtual art sculptures into real life bronzed art sculptures that I could create and sell to my art customers. To be able to see my art as a tangible tactile object to see and touch in real life would bring so much more meaning to my art !
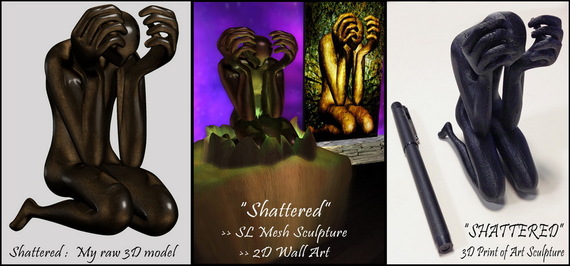
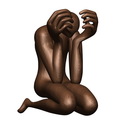 Raw 3D model image
 He was referring to my raw SHATTERED 3D art model as I had posted it as a high rez image on my Deviant Art profile (image to the left - click image to see it on my Deviant Art site). I never thought anyone would see this raw model and want to have access to the actual MODEL for the purpose of 3D printing. As such, initially I did not know if to give him my model and what to charge him for getting it.
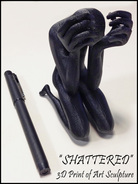 click to enlarge
 He also did tell me the purpose for him wanting Shattered. It would be made as the trophy for the loser of his buddies that play a monthly game of cards. I laughed. His story also helped me confirm his intents were legitimate and solely meant for a one time print for personal reasons.
We agreed to the deal. I emailed him an exported lower resolution STL formatted file of my Shattered model from my Zbrush and also gave him my mailing address. Five weeks later a box arrived with my raw 3D print of Shattered in Black ABS plastic. As you can see from the image on the right, it is actually quite small - 3.5" tall. The pen laying beside the model gives a good perspective of its size. If you click to enlarge the image you will see that although the print quality for a personal 3D printer is pretty good, it is still a rather low as you can actually see the layering in places (look closely at the KNEES to see an example of lower resolution 3D prints). This is expected from this lower end type of 3D printer.
| There is good news though to resolve this visible layering of ABS material models. It is commonly referred to as "Acetone Vapor Smoothing" or Smoothing the model. I have included a good quick YouTube video (courtesy of "Trenchphysics") example of what it is and how it is done. There are many variations and techniques to putting your model through an vapor smoothing step - this video just shows one way. Basically, the rough surfaced ABS plastic model is chemically surface melted by bathing the model in Acetone vapors (yes - fingernail polish remover) until the small ridges on the model sag and blend with the surrounding surface. | |
| I purchased a large lose-lid glass jar that could hold my model. I created a thin wire hanger that would suspend my model in the middle of the jar without it touching anything. I then stuffed a paper towel in the lid knob. I had a bottle of fingernail polish remover and soaked the paper towel with it. I also poured a 1/4" of this acetone into the jar. Finally I laid a sheet of paper towel over the jar and soaked it with acetone then put the lid on. To activate the vapors in the jar I placed the jar on my stove and set the element to the lowest of "keep warm" heat. Then I watched the magic. | |
Well here is where I did a stupid move. Since the jar had vapors and i didn't want it to escape out of the jar and into the house, I opened the door to my back patio deck and placed the hot glass jar on the deck. Within about 5 seconds the glass jar exploded on the bottom as the hot glass was placed on a very cool deck. That was the end of my brand new smoothing jar as well as any notion to continue the smoothing. :( You can see in the last photo in the series what the model looked like after its vapor smoothing bath. Not that bad even though it could have gone in a bit longer.
| The next step was to re-apply a color and texture to the Shattered model similar to the original BRONZE that I desired it to simulate. The best I could find was a Tremclad "hammered metal" textured spray paint. So off Shattered went to be spray painted. I applied a few coats to the model to attain the glossy look and to allow the paint to further assist in smoothing the model where the vapor smoothing ended (thanks to my goof up move). After a couple days the model was completely dry to touch. |
| Although the Shattered model was not actual bronze metal and I made a couple mistakes in the final smoothing process, it turned out better than I would have expected as a 3D print coming from a small low resolution personal 3D printer. It also has been so satisfying to see my SL virtual world art sculpture actually on its knees at my office desk. But I decided my Shattered model needed a base to kneel on similar to the one it rests on in my art gallery in SL. So I started another project to make a stand out of pottery clay - something I have never done before. I went to the art store and bought a box of clay, sculpting knives, broken colored glass, paints, and brushes. Then I started on creating the stand. | |
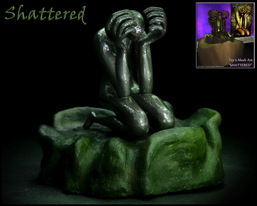
Finally, I painted the base similar to how i envisioned it in SL. I think placed my Shattered sculpture on its new stand and took some portrait photos of it in the somber dark lighting it belonged in.
For the photo I provided to the left, I inset a photo of Shattered at my SL Art Gallery so that everyone can see the transformation from 3D SL mesh sculpture, to 2D wall art, to its actual RL sculpture evolution.
Well a lot is next. Some of it I have already completed recently. As I mentioned at the beginning of this blog post, my vision and goal has always been to transform my SL virtual world art to actual metal / bronze sculptures that I could offer to my art customers as realistic priced art in RL. This first plastic model is not good enough.
| As such, I knew that the several 3D print services like SHAPEWAYS can print in several materials from plastic, to steel, sandstone, to even precious metals like silver, gold, and platinum (if you want to play $130K US for a sculpture). So in the past couple weeks I set up an account, store front, and my first Shattered model on Shapeways. Click: TO OPEN LINK TO MY SHAPEWAYS SHATTERED Although I have yet to print or have sold one of my Shattered models there, Shapeways does provide a simulation of the model if it were printed in one of the materials. To the right you see Shattered in polished bronze and silver. | |
| Then this past week via a response to one of my twitter posts of how my model is now on Shapeways, the potential door opened for me to accomplish my ultimate door. The owner of a Metal Art Sculptures foundry in China noticed my twitter posting and approached me with what they have to offer in transforming 3D model artworks into actual cast statues of bronze and stainless steel. I have been in dialog with the owner to learn more of the process and costs. The exciting news is that the production costs are far less than producing via 3D printing and it is cast bronze sculptures based on high resolution 3D SLA prints of the master mold. |
At the time of this blog post release I am still in the process of working out logistics. My plan is that if my final landed pricing of the bronze sculptures remains reasonable, my plan is to put a call out to those in my SL community and in my RL community to ask if anyone would be interested in owning my FIRST BRONZED ART SCULPTURE. It would be a FIRST CASTING they would own. If I can get a pre-order commitment for the minimum casting quantity of five, I will place an order with this foundry to cast my first art sculptures in bronze
So stay tuned for hopefully some exciting news coming from this work.


 RSS Feed

